There’s something magical about pulling a bubbling, golden-brown dish from the oven that fills your kitchen with the aroma of herbs and melted cheese. For many, this moment feels like a warm hug – a reminder of family dinners, celebrations, and the simple joy of sharing food made with care.
This iconic Italian creation has earned its place as a beloved comfort food across generations. Its carefully stacked layers – tender pasta, rich meat sauce, and creamy cheeses – work together like a symphony. Each bite delivers a satisfying mix of textures and flavors that feel both familiar and exciting.
You might think creating this masterpiece requires hours of effort. While it does involve several steps, the process flows smoothly once you organize your ingredients. The beauty lies in its flexibility: assemble it ahead for busy weeknights or freeze portions for future meals. It’s the kind of dish that tastes even better the next day, making it perfect for both spontaneous dinners and planned gatherings.
What truly makes this oven-baked wonder special is how it brings people together. Whether you’re cooking for picky eaters or hosting friends, its universal appeal never fades. Let’s explore how to craft this crowd-pleaser while keeping the preparation stress-free and enjoyable.
Table of Contents
ToggleKey Takeaways
- Celebrated as a comfort food staple with deep roots in Italian culinary tradition
- Layered construction creates a perfect balance of textures and flavors
- Straightforward preparation despite multiple components
- Ideal for meal prepping and freezer-friendly storage
- Adaptable to various dietary preferences and occasions
- Improves in flavor when made ahead or reheated
Introduction to This Timeless Italian Favorite
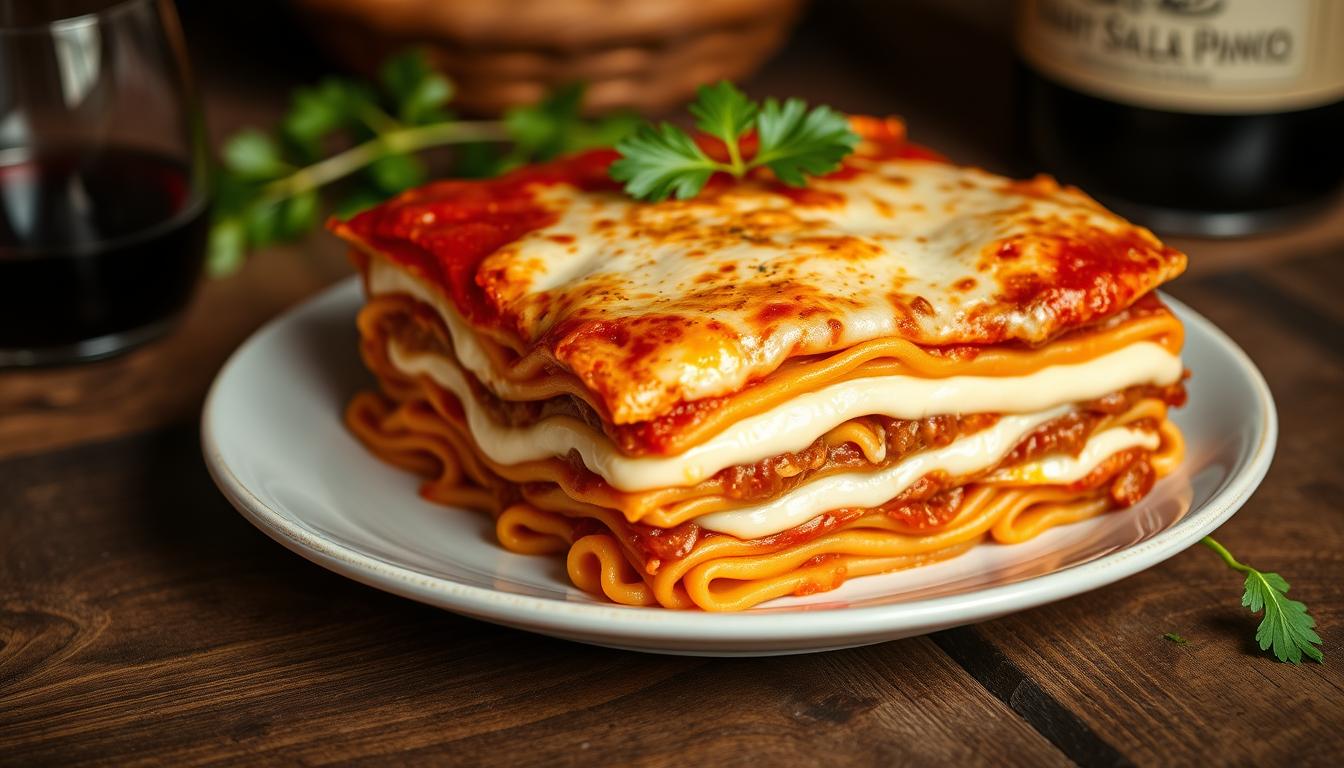
Picture cutting into a steaming slice where golden cheese stretches upward, revealing vibrant layers of sauce and pasta. This dish doesn’t just feed the body – it sparks memories of Sunday dinners and holiday tables crowded with loved ones.
Discovering the Allure of Lasagna
The magic begins with fresh lasagna noodles, their edges crisping slightly in the oven. Aromatic garlic and onion sizzling in olive oil create the base for a rich, meaty sauce. Each component builds depth, from sweet tomatoes to fragrant herbs like oregano and basil.
What makes it irresistible? Quality matters. Opt for thick noodles that hold their shape and freshly grated cheeses that melt evenly. Even a single teaspoon of seasoning can elevate the entire dish when balanced with care.
What Makes It a Family Favorite
Generations have perfected their versions, often scribbled on stained recipe cards. The process feels approachable: simmer, layer, bake. Yet the result tastes complex – a harmony of savory, creamy, and tangy notes.
- Effortless elegance: Ideal for both weeknights and celebrations
- Customizable foundation: Swap meats or cheeses to suit preferences
- Make-ahead magic: Flavors deepen when assembled in advance
Up next, we’ll explore its fascinating history and break down every step – from selecting ingredients to mastering oven temperatures. You’ll discover why this dish remains a cornerstone of Italian cooking.
Understanding the History and Appeal of Lasagna
The story of layered pasta dishes stretches back to medieval Italy, where resourceful cooks stacked flat noodles with local ingredients. Early versions used ricotta and spices long before tomatoes arrived from the Americas. By the 19th century, meat sauce simmered with tomatoes became the dish’s signature element.
A Brief Background on Italian Cuisine
Regional differences shaped this baked favorite. Northern versions often use béchamel sauce, while southern iterations favor tomato-forward recipes. Authentic preparations balance sweet-savory flavors through slow cooking – a technique refined over generations.
Key historical influences include:
- Ancient Roman “lasanum” pots used for layered meals
- Introduction of New World tomatoes in the 16th century
- Industrial pasta production making noodles widely available
| Region | Sauce Base | Cheese Blend | Pasta Style |
|---|---|---|---|
| Emilia-Romagna | Béchamel | Parmigiano-Reggiano | Fresh egg noodles |
| Campania | Tomato-meat | Mozzarella di Bufala | Dried semolina |
| Sicily | Tomato-herb | Ricotta Salata | Curled edges |
Why You’ll Love This Classic Dish
Modern versions honor tradition while offering flexibility. Simmer ground beef with garlic and a teaspoon of oregano for 45 minutes to develop rich flavors. The oven transforms layered components into a cohesive masterpiece – crispy edges contrasting with creamy centers.
Three reasons it endures:
- Depth from slow-cooked tomato sauces
- Customizable meat and cheese combinations
- Freezer-friendly for easy meal planning
Gathering Your Essential Ingredients
Great meals start with quality components, and your layered masterpiece is no exception. Fresh, well-chosen elements transform simple items into a cohesive dish that’s greater than the sum of its parts. Let’s break down what you’ll need to build those signature layers.
Selecting Fresh Pasta and Noodles
Opt for lasagna noodles specifically – their wide, flat shape supports heavy sauces better than standard pasta. Look for options labeled “oven-ready” to skip pre-boiling, or choose traditional varieties that require brief cooking. For gluten-free versions, rice-based noodles hold up well during baking.
Cheese, Meat, and Savory Seasonings
The cheese trio – ricotta, mozzarella, and parmesan – each plays a distinct role. Creamy ricotta adds richness, while shredded mozzarella creates that iconic stretch. Finely grated parmesan delivers a salty kick. If you’re out of ricotta, cottage cheese blended with an egg makes a smooth substitute.
For the meat base, combine ground beef with Italian sausage for depth. Brown them thoroughly in a heavy pot to develop flavor. Season with garlic, oregano, and a teaspoon of red pepper flakes for warmth.
- Essential measurements: 12 noodles, 2 cups tomato sauce, 15 oz ricotta
- Equipment tip: Use a 9×13-inch baking dish for even layers
Remember: Fresh herbs and whole-milk cheeses elevate the final result. Pre-shredded varieties often contain anti-caking agents that affect texture. When assembling, keep ingredients at room temperature for easier spreading.
Setting Up Your Kitchen for a Stress-Free Cooking Experience
Transform your kitchen into a well-oiled machine before turning on the stove. An organized workspace turns chaotic cooking into a smooth process, letting you focus on building flavors rather than hunting for tools.
Preparing Your Workspace Efficiently
Clear counters and pre-measured ingredients save precious minutes. Start by washing utensils and lining up your large pot for boiling noodles. Keep a 9×13-inch baking dish nearby – its size prevents overflow and ensures even layers.
Follow this battle plan:
- Wipe surfaces to avoid cross-contamination
- Arrange spices and cheeses within arm’s reach
- Fill the pot with water early to reduce wait time
Pre-measuring matters. Portion sauces and cheeses into small bowls so assembly flows like clockwork. This prep step guarantees consistent layers and prevents overpouring.
Don’t forget the foil! Covering your dish during the first 25 minutes of baking locks in moisture. Remove it later to achieve that golden crust everyone craves. Proper heat management prevents dried edges while cooking the center thoroughly.
With everything in its place, you’ll breeze through each step. Your future self will thank you when cleanup takes half the time – leaving more minutes to enjoy that first delicious bite.
Mastering the Classic lasagna recipe for Success
Building perfect layers transforms simple ingredients into a harmonious dish. The secret lies in precise assembly and controlled baking – techniques that ensure every forkful delivers balanced flavors and textures.
Layering Techniques for Optimal Flavor
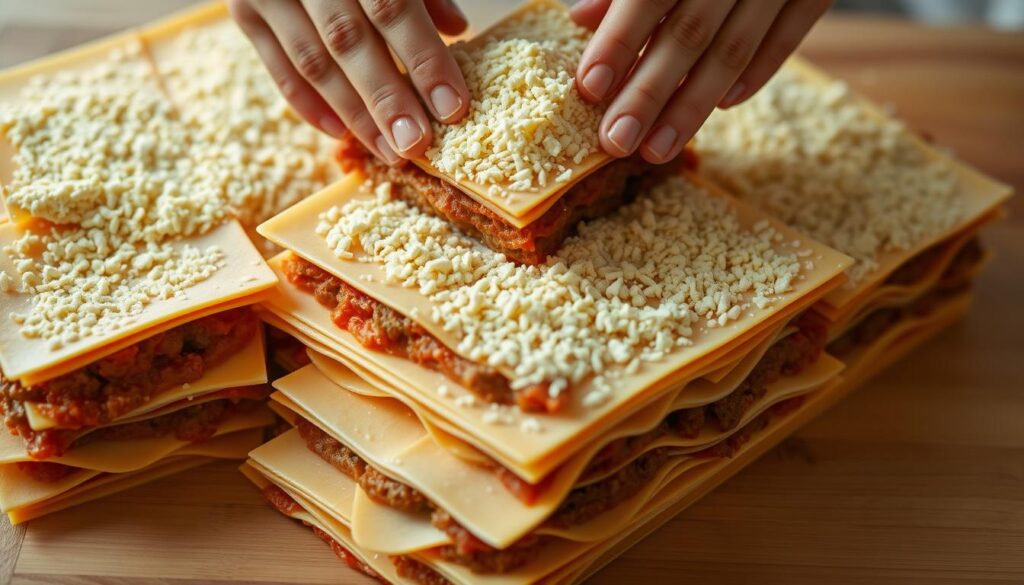
Start with a thin base of sauce to prevent sticking. Alternate between noodles, cheese blends, and meat sauce, pressing each layer gently. Use this sequence for best results:
| Layer Order | Component | Key Tip |
|---|---|---|
| 1 | Sauce (½ cup) | Cover dish bottom completely |
| 2 | Noodles (4 pieces) | Overlap edges slightly |
| 3 | Ricotta mix (1 cup) | Spread with offset spatula |
| 4 | Mozzarella (¾ cup) | Leave ½” border for bubbling |
Repeat this pattern three times, finishing with sauce and a generous cheese topping. For extra richness, add a teaspoon of olive oil between layers.
Expert Baking Tips for a Perfect Finish
Cover your dish tightly with foil during the first 25 minutes at 375°F. This steams the noodles while melting cheeses evenly. Remove the foil and bake 15 more minutes until golden.
Common issues solved:
- Soggy layers: Let sauce cool before assembling
- Dry edges: Place a water-filled pot on the oven’s lower rack
- Uneven browning: Rotate dish halfway through baking
Rest your creation 20 minutes before slicing. This lets the cheese set and layers stabilize – ensuring picture-perfect portions every time.
Secrets to a Flavor-Packed Meat Sauce
Crafting the perfect meat blend is an art that transforms simple ingredients into a hearty centerpiece. Your sauce’s depth comes from balancing textures and spices – a process where patience pays off in every bite.
Choosing the Right Meat Mixture
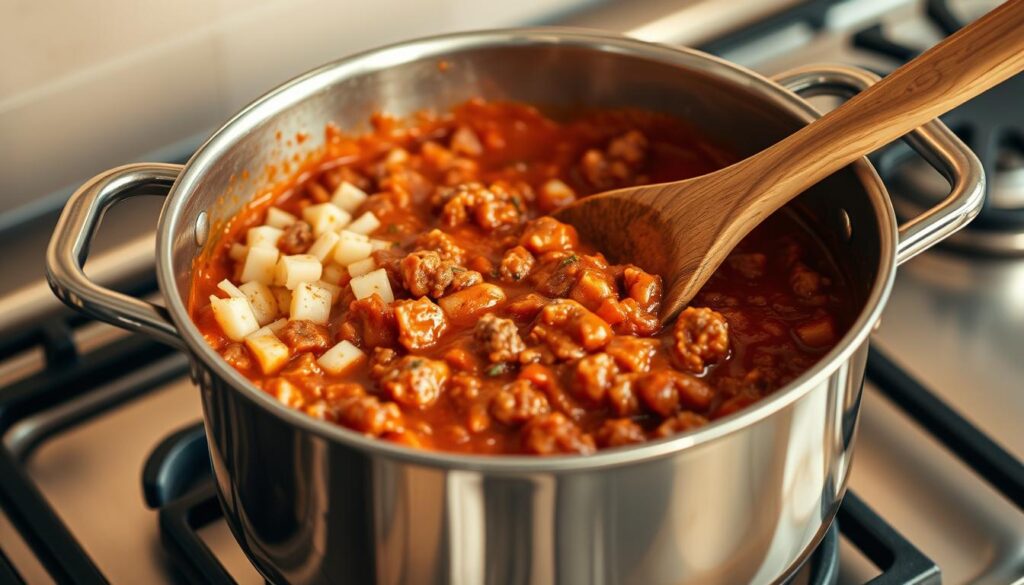
Start with equal parts ground beef and Italian sausage. The beef adds richness, while the sausage brings subtle heat and fennel notes. Brown them together in a skillet, breaking clumps for even cooking.
Add minced garlic during the last minute of browning. This prevents burning while releasing its aromatic oils. For seasoning, measure precisely: 1 teaspoon each of oregano and basil, plus ½ teaspoon red pepper flakes.
| Meat Blend | Flavor Profile | Best For |
|---|---|---|
| 80% beef + 20% sausage | Mild, family-friendly | Weeknight dinners |
| 50% beef + 50% sausage | Bold, spicy | Adult gatherings |
| 100% sausage | Peppery, aromatic | Flavor enthusiasts |
Simmer your meat sauce with 2 cups of crushed tomatoes for 45 minutes. Stir occasionally, letting liquids reduce until the mixture clings to your spoon. Cover the pot with foil between stirs to lock in moisture.
When layering, use ¾ cup of sauce per layer. This prevents sogginess while ensuring each bite delivers balanced flavors. Finish with a sprinkle of parmesan – its salty tang cuts through the richness perfectly.
Delicious Cheese Fillings and Versatile Substitutions
The right cheese blend can elevate your dish from good to unforgettable. While traditional recipes rely on specific combinations, modern cooks have discovered clever swaps that maintain richness while accommodating different tastes.
Ricotta Versus Cottage Cheese Options
Ricotta cheese delivers a velvety texture and mild sweetness, perfect for binding layers. Its fine curds melt smoothly, creating a cohesive filling. For a lighter alternative, cottage cheese offers a tangier profile with distinct curds. Blend it briefly to mimic ricotta’s creaminess.
| Cheese Type | Texture | Best Use | Quantity per Layer |
|---|---|---|---|
| Whole-milk ricotta | Creamy, smooth | Traditional fillings | 1½ cups |
| Blended cottage | Light, airy | Low-fat versions | 1¾ cups |
| Mozzarella cheese | Stretchy, mild | Top layer | 1 cup shredded |
Combine your chosen cheese with parmesan cheese (¼ cup) and a teaspoon of garlic powder. This mixture adds depth without overpowering other flavors. For extra richness, fold in an egg – it helps stabilize the filling during baking.
When layering, distribute the cheese evenly but avoid overpacking. Alternate with sauce to keep each bite moist. Remember: the final layer should feature mozzarella for that golden, bubbly finish everyone loves.
Optimizing Your Assembly Process
Perfect assembly turns good ingredients into a masterpiece. You’ll want to approach this step like constructing a flavorful tower – each tier needs careful placement to maintain structural integrity and flavor balance.
Layer by Layer: Sauce, Noodles, and Cheese
Start with a ½ cup of sauce spread across your baking dish. This creates a non-stick foundation. Place noodles slightly overlapping – their edges will expand as they cook. Follow this sequence:
- Cheese mixture: Dollop 1¼ cups ricotta blend between noodles
- Meat sauce: Spoon ¾ cup evenly without pressing down
- Repeat: Build 3-4 tiers, ending with noodles
The top layer demands attention: cover noodles completely with sauce, then blanket with shredded mozzarella. Leave a 1-inch border to prevent cheese from adhering to the dish’s edges.
Resting Time and Serving Suggestions
Once baked, let your creation rest 15 minutes. This pause allows the layers to firm up, ensuring clean slices. Cover loosely with foil during the first 25 minutes of baking to trap steam, then remove it for the final 15 minutes to achieve a golden crust.
Pro tip: Use a serrated knife for serving – it glides through crispy edges without dragging cheese. Pair with garlic bread to soak up any extra sauce clinging to your plate.
Freezing, Meal Prep, and Reheating Tips
Meal planning becomes effortless when your freezer holds ready-to-bake portions of this crowd-pleaser. Assemble your dish up to two days ahead – cover tightly with plastic wrap and refrigerate. For longer storage, freeze unbaked portions in airtight containers for up to three months.
When freezing, divide into single-serving squares using parchment paper. This lets you reheat just what you need. Always label containers with dates – frozen recipes taste best within 60 days.
For reheating, the oven works best. Thaw overnight in the fridge, then bake covered with foil at 375°F for 25 minutes. Remove the foil and bake 10 more minutes to crisp the top. Microwave smaller portions on high for 2-3 minutes, stirring halfway.
Pro tips for busy cooks:
- Prep sauce and cheese mixtures separately – combine during assembly
- Use disposable aluminum pans for freezer-to-oven convenience
- Add a cup of water to the oven rack below to prevent drying
With these strategies, you’ll always have a comforting meal ready in under 30 minutes. Your future self will appreciate the prep work during hectic weeknights.
Health, Nutrition, and Pairing With Sides
Balancing indulgence with nutrition makes every meal both satisfying and smart. Understanding what goes into your favorite baked dish helps you enjoy it fully while meeting your dietary goals.
Caloric and Nutritional Information
A typical serving contains about 350-400 calories, with 18-22 grams of fat. Using lean beef (90/10 blend) reduces saturated fat by 30% compared to regular ground meat. A teaspoon of salt divided across layers enhances flavor without exceeding daily sodium limits.
Pairing pepper with herbs like basil minimizes the need for excess salt. For lighter versions, swap full-fat cheeses with part-skim ricotta and low-moisture mozzarella. These tweaks maintain creaminess while cutting calories by 15% per portion.
Complementary Sides for a Complete Meal
Bright, fresh sides balance the richness of baked dishes. Try these pairings:
- Crisp greens: Arugula salad with lemon vinaigrette adds acidity
- Roasted veggies: Zucchini or bell peppers bring earthy sweetness
- Whole grains: Garlic-herb quinoa offers fiber and texture contrast
Remember: Quality ingredients elevate every dish. Opt for grass-fed beef and organic tomatoes when possible. Moderation lets you savor each bite while keeping meals nutritionally diverse.
Conclusion
Every kitchen deserves a go-to dish that bridges generations through shared moments at the table. With careful layering of lasagna noodles, savory beef, and creamy mozzarella cheese, you craft more than a meal—you create edible memories.
Mastering this timeless favorite comes down to three essentials: quality ingredients, patient assembly, and precise baking times. Letting flavors meld overnight often yields richer results, proving good things come to those who wait. A simple teaspoon of herbs or swap of cheeses lets you put your unique spin on tradition.
Whether prepping for busy weeknights or festive gatherings, this dish adapts effortlessly. Use foil during the first half of cooking to lock in moisture, then uncover for that golden finish. Leftovers taste even better after a day or two, making it ideal for meal planning.
Now it’s your turn. Gather fresh ricotta cheese, fire up the oven, and layer with confidence. Share your creation using #ComfortFoodCreations—we’d love to see how you make this classic your own. After all, the best recipes aren’t just eaten… they’re experienced.
FAQ
Can I use no-boil noodles instead of traditional ones?
Yes! No-boil noodles work well and save time. Just ensure your sauce has enough moisture to soften them during baking. Layer them evenly to avoid gaps.
How do I prevent the meat sauce from becoming greasy?
After browning ground beef or sausage, drain excess fat using a colander or spoon. Blotting cooked meat with paper towels also reduces grease in the final dish.
What’s the best way to layer lasagna for even flavor?
Start with a thin base of meat sauce to prevent sticking. Alternate noodles, ricotta or cottage cheese mixtures, shredded mozzarella, and sauce. Finish with a cheese layer for a golden top.
Can I prepare lasagna ahead of time and bake it later?
Absolutely. Assemble it, cover tightly with foil, and refrigerate for up to 2 days. Add 10–15 minutes to the baking time if cooking straight from the fridge.
How long should lasagna rest before serving?
Let it sit for 15–20 minutes after baking. This helps layers set, making slicing cleaner. Cover loosely with foil to retain warmth during resting.
Can I substitute cottage cheese for ricotta?
Yes—cottage cheese offers a lighter texture. Blend it briefly for smoother consistency, or use small-curd varieties for a similar effect to traditional ricotta.
What sides pair well with this dish?
Garlic bread, a crisp green salad, or roasted vegetables like zucchini balance the richness. A light red wine, such as Chianti, complements the savory flavors.
How do I freeze leftovers without drying them out?
Portion cooled lasagna into airtight containers. Separate layers with parchment paper. Thaw overnight in the fridge, then reheat covered with foil at 375°F until bubbly.